
Creating Art Packs
Art packs are a new feature in Nortantis starting in version 3.0. They allow you to create custom icons, borders, and background textures, and can be shared as zip files, making them easy to import.
As my last post mentioned, Nortantis comes with technical documentation for the structure of art packs in Edit -> Custom Images Folder, but this post goes into much more detail.
Creating an Art Pack Folder
In Nortantis, go to Tools -> Art Packs -> Open Art Packs Folder. This folder holds all of the art packs installed on your machine (exceptions: the “nortantis” art pack, which is the built-in art, and any “custom” art pack; I’ll explain more about custom art packs later in this post). So, creating an empty art pack is as simple as creating a new sub-folder in the art packs folder. For this tutorial, we’ll call our new art pack “test art pack”, so create a folder with that name.
Since the “test art pack” is currently empty, it won’t show up in Nortantis. To fix that, in the “test art pack” folder, we’ll create sub-folders for each type of image you want to include in the art pack. Here are the options:
background textures
borders
cities
decorations
hills
mountains
sand
trees
Those folder names must exactly match the spelling and case above, or Nortantis won’t find them.
What type of images should go in each folder is usually clear from the folder’s name, but I will clarify a few. The “background textures” folder is for “Texture” options in the “Background” tab (in the left panel in Nortantis). To see the “Texture” dropdown, you’ll need to set the “Background” option to “Generated from texture” and set “Texture source” to “Assets”.
The “border” folder holds the types of borders that populate the “Border type” dropdown in the “Border” tab.
The other folders hold types of images drawn in the Icons tool, although note that the “sand” folder corresponds to “Dune” images in the UI. If you’re curious why that folder isn’t named “dunes”, there isn’t a good reason; it’s just something I chose years ago and when I created Custom Images Folders, and I haven’t changed it because doing so would break compatibility with maps that use that feature.
When you’re done creating these folders, the “test art pack” folder should look like this (assuming you created folders for all types of images):

To check your setup, go back to Nortantis and refresh your map and assets by pressing Ctrl+R (or go to File -> Refresh Images and Redraw), then go to the Icons tool and check that your new art pack appears in this dropdown:

Within each of the icon-type folders we created in the “test art pack” folder, you can create subfolders to group different icons. For example, under the “trees” folder you could create subfolders named “pines” and “cacti”. To see icon groups in the UI, switch to an art pack that isn’t empty, make sure the “Mode” is either “Draw” or “Replace”, and look at the icons listed at the bottom of the tool:

Now that you have an empty art pack, let’s look into how to create images for it.
Icons
Icons in Nortantis are images like trees or mountains that you can place on your map using the Icons tool. In that tool, the “Art pack” dropdown filters the icons by art pack. Right now, selecting your art pack won’t show any icons since your art pack is empty.
Shuffled vs. Named Icons
Before we get into creating icons, it will be helpful for you to understand the two types of icons in Nortantis: shuffled icons (mountains, hills, dunes, and trees) and named icons (cities and decorations).
As explained in the previous section, icon groups can be created for all types of icons, but how the groups are drawn on the map is different for shuffled vs named icons.
Shuffled icons are drawn by randomly selecting an icon from a group folder. Named icons, however, are selected individually by the user when drawing instead of being chosen randomly. I call them “named” because the file name (not including encoded height or width, which I’ll explain in later in this post) of the specific icon you pick is stored in your nort file when you save a map.
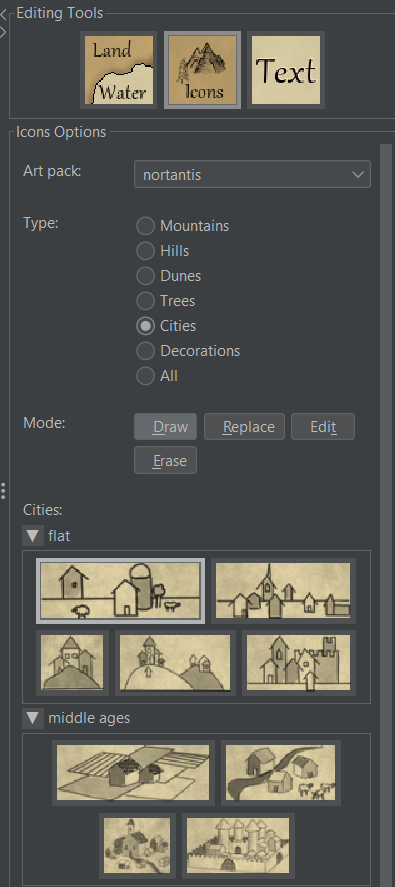
To see how individual named icons are selected in the UI, switch the “Type” to Cities. The icons are still grouped, but the groups are just to organize the icons on the screen rather than provide a set of icons to randomly choose from when drawing:
When creating an art pack, this difference becomes important when adding or removing icons from a group. If you add a named icon to your map, then add another named icon to that group, the first icon on the map remains unchanged. But if you add a new icon to a shuffled icon group, that will cause existing icons in that group on your map to re-shuffle. This is convenient if, for example, you want to add a new mountain image to a mountain group and you want Nortantis to automatically mix it in with the mountain ranges you’ve already drawn.
Art Pack Folder Structure for Icons
As mentioned earlier, the groups for each icon type correspond to subfolders of the folders for each icon type in your art pack. Those subfolders then contain the icon images files. I’ll lay out the generic folder structure needed for Nortantis to find your image files, then give a specific example. If your art pack folder is named “test art pack”, then, when you place icons in it, they must be placed in the following folder structure:
test art pack\cities\<city type>\<city images>
test art pack\decorations\<decoration type>\<decoration images>
test art pack\hills\<hill type>\<hill images>
test art pack\mountains\<mountain type>\<mountain images>
test art pack\sand\<dune type>\<sand dune images>
test art pack\trees\<tree type>\<tree images>
The placeholder <city type>, <decoration type>, <hill type>, <mountain type>, <dune type>, and <tree type> are the icon group folders, which you can name whatever you want. Also, you can have multiple group subfolders of each icon type. The placeholders in angle brackets after the group folders represent where to put your icons (in PNG format).
Here’s an example. The bonus art pack I announced in my last post has these subfolders of the “cities” folder:

Which corresponded the three icon groups in Nortantis when you select the bonus art pack in the Icons tool:

When we open the “flat european” folder, we can see it contains the images for that group:

Creating Icons
This section covers how to prepare images inKrita for export to Nortantis. You can use any image editor that creates PNG images, but I use Krita because it’s free, works well, and has a batch exporter, which saves a lot of time.
First, create a combined image that has the icons for a group you want to add to Nortantis, like the one below. If you’re an artist, then this is where you work your magic. I used AI to create the image below because it’s just an example for this tutorial, but if you’re creating a real art pack to share/sell or use in a published novel, I recommend avoiding AI because it leads to copyright issues and many users don’t want it. Also, cartographyassets.com restricts AI usage (and I don’t blame them for it considering the quantity of low-quality submissions they seem to be getting based on the email they sent out when they announced that policy change).

Nortantis still uses AI art for some of its built-in decorations, and I’m still using it in the map for one of my book series, but I’m working on transitioning away from it.
Next, open the image in Krita, and do the following:
Save as a *.kra file.
If your icons should be grayscale, then Filter -> Adjust -> Desaturate.
If needed, make the background fully white instead of off-white. This is important because a slight tint to the background will show up as shading to the background of icons in Nortantis. Use Filter -> Adjust -> Levels. In the “Input Levels” slider, drag the right-most slider to be just to the left of the big spike on the white side of the graph. Note that for the example image given above, the white levels are pretty much already 100% white, so you won’t see a much difference.
Make the background transparent by converting white to alpha. Filter -> Colors -> Color to Alpha.
Move each icon you want to export to Nortantis to its own layer. In this case, that’s each mountain. To do that, use the Rectangular Selection Tool in combination with Layer -> New -> Cut Selection to New Layer (or Copy Selection to New Layer). Make sure to give each layer a unique name.
Although this is optional, I recommend adding a transparency mask to each icon to control how dark they drawn on your map, and so the paper texture behind the icon bleeds through the icon’s content. Unfortunately, simply adjusting the opacity of layers doesn’t work with the Krita Batch Exporter, so the best way I’ve found is to add a transparency mask to each icon’s layer. Right-clicking the layer, then Add -> Add Transparency Mask. Then use the fill tool to fill the transparency mask with a gray shade like red=170, green=170, blue=170.
To select specific colors using numbers like I recommend above, you’ll need to enable the Specific Color Selector in Krita by going to Settings -> Dockers -> Specific Color Selector.
Note that you could have done this a lot faster by using an eraser to set the transparency of the entire image before step 5, but I don’t recommend that because then you can’t easily adjust the transparency later.
As of version 3.18, you can tell Nortantis what alpha level to apply to icons by putting the desired alpha in the file name with either the “alpha=<number>” or “a<number>” keywords, similar to setting the desired width and height. This makes transparency masks unnecessary and makes it easier to adjust the alpha of images from the image files in the art pack rather than having to do it in Krita. Example: “tree 1 a128.png”. See this post. As with other filename-encoded parameters, setting the value for one image in a folder will cause the other images in that folder to inherit the same value.
Of course, for this to work, anyone using your art pack must have at least Nortantis version 3.18. That blog post describes how to add a settings file to your art pack that can tell Nortantis what version it requires, although that settings file was also added in version 3.18, so earlier versions will ignore it. And not only that, older versions will not only ignore your alpha values in the file names, the alpha values will be treated as part of the file names, which means when the user upgrades Nortantis it will think the files don’t exist anymore, which will cause it to possibly substitute other files from the same folder; yeah, the forward compatibility here is not great, but there’s not much I can do about it, and hopefully the required version in the settings file will prevent this from happening again. Bottom line: if you use this feature, you might consider documenting somewhere that your art pack requires version 3.18 or later. Or you can wait until version 3.18 is getting old and so hopefully everyone is off previous versions.
Your layers in Krita should look something like this:

The Krita batch exporter is not enabled by default, so if you haven’t enabled it yet, follow the instructions here.
To export your icons, select the layers with the icons (not including the transparency masks, since those will sometimes crash the exporter), then under Batch Exporter, click “Selected Layers”.
This will create an “export” folder next to your kra file containing each of your icons in a separate PNG image file, each named after the corresponding layer from Krita.
Now, move those images to your art pack. In your “test art pack” folder, go to Mountains (or the folder for whatever type of image you’re adding), then create a new folder for the group. I’ll call this one “test mountains”. Then move your exported images to that folder. Here’s what that folder should look like (I only exported 6 of the example mountains):

Now, in Nortantis, go to File -> Refresh Images and Redraw, and your new mountain group should appear in the icons tool:

Try drawing some of the new mountains onto the map to see what they look like. You can also see what your icons look like with a new map by selecting your art pack from the various options when you create a new map.
Tip: When testing new icons on a map, turn up the display quality (in the lower-right of the main window) to Medium or High. It will slow down drawing, but it’s worth it when you need to zoom in to see details.
Remember that any time you make any change in your art pack folder, to get Nortantis to see that change, you must go to File -> Refresh Images and Redraw, or re-open the map. This is because Nortantis caches the images it draws to speed-up redraws.
Controlling Icon Size
In the above example, you might have noticed that Nortantis picked a size your mountains should draw at when you drew them onto the map. The sizes it picks are usually good, but there are ways to manually decide what size the icon will be. Here’s what goes into determining the size icons draw at:
Draw resolution - if you export your map at a higher resolution, or increase the display quality in the UI, Nortantis draws icons larger to keep them at the same relative size with respect to the rest of the map.
World size - you can pick the world size when you create a new map, then afterwards it is immutable. A larger world size means the map has more polygons so that it has more details. Nortantis shrinks icons with a larger world size to fit those details and make the map feel like it is depicting a larger world.
Type-level scaling - in the left panel, in the Effects tab, there are sliders for each icon type to scale all icons of that type.
Individual icon edits - The icons tool lets you scale individual icons. Note that for mountains and hills, the icon’s initial size is based on the size of the polygon the mountain or hill was first drawn on. This is why mountains and hills draw at varying sizes.
Size calculated based on icon file size and size encoded into file names.
This tutorial will focus on the last option, since that’s the size encoded into the art pack. It’s also the only piece of the calculation that isn’t specific to a particular map, so it allows you to quickly resize icons for all maps that use the art pack.
You can encode a desired height or width for an icon in its file name by adding w<number> for width, or h<number> for height. For example, a file named “mountain 1 w20.png” has an encoded width of 20. As for what exactly that number means, I recommend you just take it on faith that bigger means bigger and smaller means smaller, but if you really want to know, the unit is 1/11 x (the average width of polygons on the map). Note that you can either encode a width or a height, but not both, because providing both can result in icons being stretched, which does not look good.
There is also a more verbose way of encoding sizes into filenames using width=<number> and height=<number>, but I recommend using the shorter method because the Krita batch exporter strips out ‘=’ signs from layer names when naming files.
So far this might seem pretty simple. Just put these size hints in your file names, and everything works, right? But adding encoded sizes to every image you export to Nortantis becomes tedious quickly. For example, if you have images of larger mountains and images of smaller mountains, you probably want them to draw proportionately larger and smaller on your map, right? If you add an encoded size on every icon, then you have to calculate what those sizes should be based on their relative sizes to all the other mountain icons.
Yuck. That’s why I designed Nortantis to try to be smart about picking sizes for icons when some icons in the same group don’t have encoded sizes.
There’s some complexity to how Nortantis does this, but most of the time here’s how it works:
If an icon has an encoded size, then it uses that size.
For icons without an encoded size, if another icon in the same group (the same folder) has an encoded size, then calculate the size of this icon based on the size of that icon adjusted for the difference in their relative image sizes. For example, if a group has “mountain 1 w20.png” and “mountain 2.png”, and mountain 1 is 100px wide and mountain 2 is 75px wide, then mountain 2 will draw at size 20 x (75/100) = 15 wide.
If multiple icons in the same group have encoded sizes, then the icon without an encoded size will use the size of the widest icon with an encoded size to calculate its own relative size.
If no icons in the group have an encoded size, then Nortantis assigns a default size to the widest icon in the group, and other icons in that group are sized with respect to that one. Those sizes are stored in ImageCache.java, in the method getDefaultWidthOrHeight, as:
Mountains: 20.5 wide
Hills: 10.5 wide
Dunes: 13 wide
Trees: 20 tall
Cities: 32 wide
Decorations: 45 wide
Note that although the default mountain and hill sizes use decimals, the sizes encoded in filenames must be whole numbers. I used decimals for those types for backwards compatibility with existing custom images folders from before I introduced encoded sizes in file names for shuffled icons.
If you don’t want to think about all this complexity, you can usually get away with simply giving an encoded size to one icon in the group, and the rest will automatically resize to maintain their relative size to that one.
Special Icon Group Names
Certain icon group folder names have special meanings when creating new maps. If you’re just creating an art pack for your own use on a map you’ve already created, then you can ignore this. Otherwise, read on.
Trees
Nortantis is based on a procedural island generator, and it uses the biomes created by that generator to determine where to place trees (among other things), and what types of trees to draw. To match trees correctly with biomes, (for example, to make sure cacti appear in the desert and not pine trees), Nortantis uses three specific labels, “cacti”, “deciduous”, or “pine”. If your tree group folder name exactly matches one of those names, it will be preferred for the biomes for those tree types. If none are found, Nortantis will look for a tree group folder that includes one of those labels as part of its name. If still none are found, Nortantis will pick tree groups for biomes arbitrarily.
If you want to know how biomes are mapped to tree types, check out IconDrawer.java, where it initializes forestTypes.
Hills
Mountains often have hills near them, so you might want to create hill groups that go with each mountain group. To tell Nortantis that a hill group should be drawn with a particular mountain group, give the two group folders the same name.
Background Textures

There are two options for creating backgrounds in Nortantis (in the “Background” tab of the left panel): “Fractal noise” and “Generated from texture”. The second option uses a microtexture generator to create textures of arbitrary dimensions and size based on a seed texture, without directly copying the original texture or tiling it. Instead, it extracts frequency data from the texture and uses that data to filter white noise into an image that has similar frequencies to the original. The technique works great for textures like paper, leather, and stone, where there are no clearly visible objects or lines on the original texture (or more precisely, those objects are smaller than one pixel, which is why it’s called a microtexture). This allows Nortantis to take a texture like the image below and generate a large, paper background.

Seed image - Cropped section of the back of the Declaration of Independence

Texture generated from the seed image
By default, Nortantis replaces the texture’s color with the map’s land and ocean colors, but you can instead use the texture’s color by unchecking the “Color ocean” or “Color land” checkboxes in the “Background” tab.
To make a texture appear in the “Texture” dropdown, simply put it in your “background textures” folder in you “text art pack” folder, then Ctrl+R in Nortantis. The name of your art pack will appear in square brackets to the right of the name of the texture in the dropdown. Note that unlike other folders in art packs, this folder does not use sub-folders.
I recommend using background texture images that are at least 800x800 pixels, or preferably 1000x1000 pixels, so that they are high enough quality to look good. If their resolution is too low (< 1/5 times the resolution the map is drawing at), Nortantis will scale them up before using them, which will make the background blurry. (In theory the texture generator could generate a larger texture from a small seed image, but I’ve found that this creates undesirable noticeably repeating patterns.)
Borders

Borders are the decorative patterns Nortantis puts around the outside of the map, sometimes called frames. You can see the available border types in the Border tab in the left panel.
Like with background textures, the art pack name in the dropdown appears in square brackets after the border type name.
To create a new border type, create a sub-folder in the “borders” folder, then add images for the corners and edges. Nortantis looks for specific image names to determine where on the border each image should be drawn. Here’s the list of image names it recognizes:
upper_left_corner.png
upper_right_corner.png
lower_left_corner.png
lower_right_corner.png
top_edge.png
bottom_edge.png
left_edge.png
right_edge.png
At a minimum, you need one edge and one corner, and Nortantis will create the others by rotating the corner and edge you give it.
For examples of border images, take a look at these images , which are the images for borders that come with Nortantis.
Border images need to work with maps of any dimensions and border width. As such, if your edge images are not long/tall enough to cover the needed distance, they will be repeated. So I recommend using edge images that look good with repeated copies side-by-side.
Also, since borders are drawn outside the map rather than over it, I recommend using edge images with a line on the inner edge that will delineate the border from the map, since otherwise land at the edge of the map would end abruptly with a gap between it and the border.
You might have noticed that the built-in border “dashes with inset corners” has corners which draw inset over the map, as seen in this screenshot. To make your border do this, make your corner image larger (in terms of number of pixels) than the part of the edge image that touches the corner. For example, in the “dashes with inset corners” border, upper_left_corner.png is 512x512px, while the width of right_edge.png and the height of top_edge.png are 316px.

Sharing Your Art Pack
To share your art pack, simply compress it into a zip file. In Microsoft Windows, you can do this from your file explorer by right clicking on the folder for your art pack (such as “test art pack”), then Compress to… -> ZIP File. When other people receive the zip file, they can then load it into their art packs folder using Tools -> Art Packs -> Add Art Pack. Note: Art packs do not need to be unzipped before loading into Nortantis.
Custom Images Folders
Before I created the art packs feature, you could add your own icons to your map using Edit -> Custom Images Folder. It allowed you to select a folder with the same file structure as an art pack, and the images in it replaced the built-in ones. This technique, however, was limiting because each map had to be configured with the custom images folder, and the folders weren’t as easy to share as art packs.
With the release of art packs, I changed custom images folders to create an art pack named “custom”, which, instead of replacing the built-in images, can be used alongside the built-in art and any installed art packs.
Why am I still supporting custom images folders alongside art packs? For two reasons:
Backwards compatibility
Custom images folders are convenient when you want to add images that are specific to the map you’re working on without making them available to all maps on your machine.
Custom images folders allow you to select any folder on your system, which is convenient if you want to share that folder with others through file-synchronization services like Dropbox.
Tip: In case you’re wondering how Nortantis can use a custom images folder from a Dropbox folder on two different machines with different logged in user names, when the path to your Dropbox includes your user name, Nortantis doesn’t actually store the home folder path in the nort file. It uses a placeholder, which it replaces at runtime. So a map with a custom images folder in Dropbox can open on two different machines with differing logged-in user names as long as their Dropbox folders are in the same relative locations to their home folders. And this is true for all file paths stored in nort files.
Conclusion
This concludes my explanation of how to create your own art pack. I hope you enjoy this new feature! If you have questions, you can contact me through this form or by submitting an issue on GitHub.